
|
Isuzu Trooper Owners Club UK
Isuzu Trooper, Rodeo, Bighorn, Mu & VehiCROSS Owners Club
|
| View previous topic :: View next topic |
| Author |
Message |
Philip A.
**
Joined: 28 Nov 2012
Posts: 53
Location: East Africa
|
 Posted: Sun Jul 21, 2013 14:07 Post subject: Trooper/Bighorn full mods for the bush - Journal Posted: Sun Jul 21, 2013 14:07 Post subject: Trooper/Bighorn full mods for the bush - Journal |
 |
|
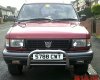
A few weeks ago, I purchased a 1995 3.1 Trooper (or Bighorn as they call them in Japan - which is where most cars around here are imported from - but I'll stick to Trooper...).
It will have to drive on the worst roads available in East and Central Africa, and spend some considerable time offroad in the bush, in some of the most remote places in the region, carrying heavy loads under strict instructions to get everybody and everything out the same way we went in.
I run safaris in the top North-East corner of Uganda, a stone throw from South Sudan and Kenya, and the place is considered remote and difficult to access even by local standards. Unsuitable or ill-prepared cars are quickly weeded out...
I'll document all the mods as the work progresses, and post pictures of each finished item in this thread. The list includes winch and winch bumper, rear bumper, suspension works, slight body lift, dual batteries, on-board air, roof rack and ladder, recovery equipment, and a few other "bushwhacker" touches. Oh, I almost forgot... add an engine rebuild, since I got the beast for a song on account that the ticker has some deep and not fully diagnosed problem.
This is the starting point:

Note how carefully the last Illiterati grease monkey put the grille back together. Gives you an idea of why, if you want your car to stay alive in Africa, you should never-ever leave it in a mechanic's hands, not under ANY circumstances...
 |
|
| Back to top |
|
 |
Google
Sponsor

|
| Posted: Sun Jul 21, 2013 14:07 Post subject: Google Ads keep this community free to join! |
|
|
|
|
| Back to top |
|
|
Slate
Lifetime member

Joined: 08 Aug 2011
Posts: 331
Location: Walsall, West Mids
|
| Posted: Sun Jul 21, 2013 14:52 Post subject: |
|
|
lol,I look forward to seeing the pictures as you mod the truck  |
|
| Back to top |
|
|
DYLAN
Moderator


Joined: 25 Sep 2006
Posts: 5115
Location: Chesterfield, Derbyshire
|
| Posted: Mon Jul 22, 2013 9:50 Post subject: |
|
|
As above, Good luck with it, I would say you have one of the most reliable motors money can buy 
_________________
 
2002 S-TYPE JAGUAR 3.0 SPORT |
|
| Back to top |
|
|
jacksdad1963
*******
Joined: 26 Jul 2011
Posts: 1939
Location: Oldham, Lancs
|
| Posted: Mon Jul 22, 2013 16:27 Post subject: |
|
|
I can come over and give you a hand with this, I'm really cheap, will work for next to nothing actually:
You pay the flights etc. and I can be with you within days! 
_________________
1999 3.0 TD Duty SWB
3" Body lift, 3" suspension lift, diff dropped, balljoints flipped, extended panhard, Tree sliders, Superwinch, +2" Pro Comps, 33" Mudders: Nearly finished! |
|
| Back to top |
|
|
Philip A.
**
Joined: 28 Nov 2012
Posts: 53
Location: East Africa
|
| Posted: Sun Aug 11, 2013 15:40 Post subject: |
|
|
Time to start ticking boxes on the list. But before ticking, here is the list of the planned mods:
Front suspension lift 40-50mm
Rear suspensions, change springs to Range Rover 17"-18" 180lbs/inch, or spacers
Air helpers rear springs
Tyres
Drop front axle 1"
Body lift 25mm
Air tank
Air con compressor modded to air on board
Roof rack
Rear ladder
Winch
Winch bumper
Rear platform/bumper
Snorkel
Large air filter
Dust bowl intake
Dual fuel tank
Block EGR valves
Mesh grille and frame covering radiator
Gearbox plate
Larger gearbox sump
Gearbox oil cooler
Dual battery with in-cab manual switch
Extended breathers
Additional earthing straps
Lots of work done or in progress, but I've not had as much time as I wished to dedicate to the Trooper: the 200TDi in the 130 Land Rover gave up the ghost, and kept me quite busy.
Completed so far:
Tyres - Installed Toyo Open Country MT, 235/85-16. I've been extremely satisfied with the grip, handling and puncture resistance of these on the Land Rover, who spends 95% of her time in the bush, very far away from anything even remotely resembling asphalt. I have no real experience with the mileage that these Toyo can give on road, time will tell.

Lifted the body 25mm. Just to make sure that there are no tyres scraping in any situation, and also to make room for a fuel tank lift. I used Nylon pucks, turned to measure and drilled 10mm.
I also had to make a few new mounts, since some of the old ones were in a sorry state. I used rubber cut from a forklift wheel (the compound is softer than that of big tyres like tractor's, and will give the necessary spring). A tedious job with sharp knives and hole-cutting drills. Tip: soapy water really helps when cutting rubber.

Lifted the tank 50mm. I always thought that the Trooper's tank is really too low for a vehicle supposed to go offroad, and this one is definitely going there. With a 25mm body lift, you can tuck the tank up close to the body and gain another 25mm. I cut and modified the left bracket (the tank is bolted to it from below), and just added a 50mm spacer on the right bracket (the tank is bolted on top of it).
Original position:

Lifted (the protection plate not yet in place, but it's fitted almost touching the tank):

Left tank bracket:

Right tank bracket:
 |
|
| Back to top |
|
|
Philip A.
**
Joined: 28 Nov 2012
Posts: 53
Location: East Africa
|
| Posted: Fri Aug 16, 2013 7:43 Post subject: |
|
|
With the body lift, had to drop the radiator the same 25 mm to avoid the fan hitting the cowling. Since the brackets are quite beefy and generously dimensioned, it's just a matter to cut them and reposition the bottom end.
 |
|
| Back to top |
|
|
Rhanagar
Lifetime member

Joined: 12 Jan 2010
Posts: 4861
Location: Preston, Lancs.
|
| Posted: Fri Aug 16, 2013 8:16 Post subject: |
|
|
All lovely work. I am truely impressed.
_________________
1990 Isuzu Bighorn LWB Mk.I 2.8TD Manual Lotus Edition
1994 Isuzu Bighorn LWB Mk.II 3.1TD Auto Lotus Edition
Deceased
1994 Isuzu Bighorn LWB Mk.II 3.1TD Auto LS
 |
|
| Back to top |
|
|
Philip A.
**
Joined: 28 Nov 2012
Posts: 53
Location: East Africa
|
| Posted: Fri Aug 16, 2013 20:25 Post subject: |
|
|
The top radiator bracket was replaced with a new one, simply cut and bent from a piece of flat bar. A hig-tech polymer damper was cut from an old bathroom slipper... Works wonderfully.

The brackets linking the body and center cross-member were cut, lengthened, and welded (not a very pretty job, but that does it)

Front bumper painted and installed

Rear bumper/towbar installed. Like in the front, the mounting brackets are strong enough to be used as hi-lift jacking points. The two platforms are used to stand on while looking for animal tracks to follow (the sides of untarred roads are a very interesting book to read, and an excellent place to pick tracks to follow in the bush on foot in the early morning).

And here is the Trooper so far, back on the road. Not quite finished yet, still have lots to do with suspensions, batteries, roof rack, etc.

Before...
|
|
| Back to top |
|
|
ecp
Lifetime member

Joined: 23 Aug 2010
Posts: 465
Location: DURHAM
|
| Posted: Sun Aug 18, 2013 3:16 Post subject: troop |
|
|
| Fab thread keep the pics coming m8, nice part of the world i enjoyed 6 weeks in kenya just up the road. |
|
| Back to top |
|
|
Philip A.
**
Joined: 28 Nov 2012
Posts: 53
Location: East Africa
|
| Posted: Thu Aug 29, 2013 17:51 Post subject: |
|
|
Added a dual battery setup. Being an auto box, I don't want to find myself with a flat battery in the middle of very-far-away, especially not during winching season.
My Trooper came with one battery only. A friend of mine removed his second battery tray some time ago, and volunteered to pass it on to me as soon as he can remember where he put it.
Meanwhile, I've wired the car for the dual batteries. No charge controller and electronic bits and pieces, the rule is simplicity and big things that can't go wrong easily.
I fitted a Blue Sea marine battery bank switch in the cab. It has 4 positions: Off, Batt 1, Batt 1 + 2, Batt 2. Big, rugged, on-before-off between batteries so there is no voltage interruption. The batteries will be easily managed: use them on alternate days, so they stay charged.

I routed the battery positive to the switch, then from the switch to a high-tech connecting post/isolator, the big green thing in the pic. That's an old Range Rover engine mount, covered with the bottom of a 50p plastic cup, cut and drilled to measure. The other thing in the shadows is the winch solenoid, donated by my SWB Land Cruiser together with the winch.


The only drawback is the additional length of cable to the starter motor. Luckily, snowy days are not really an issue here... And by switching two 65A or 75A batteries together, that should take care of slow starts if any.
I'll also wire the alternator's sense wire through a switch so I can connect to the battery in use. Maybe it's overkill, but that should help having a proper charge regulation... |
|
| Back to top |
|
|
Philip A.
**
Joined: 28 Nov 2012
Posts: 53
Location: East Africa
|
| Posted: Thu Aug 29, 2013 18:15 Post subject: |
|
|
The roof rack is finished, too. The mounting points in the gutter are a neat touch on the Trooper, easier to fabricate mounts for these than for the standard clamp-on-the-gutter styles.
The transverse bars are 25x50x2, quite sturdy. They'll hold weight without any problem. The brackets are 3mm plate, bent and drilled.


The Trooper's roof is not flat, and a good way to get a reference line for the roof rack is to stick a masking tape along the bottom of the window line (that's the only straight line along the body).
You can then measure from the edge of the masking tape to the rack's transverse bars, allowing you to set the rack so that it does not point to the sky at one end or the other.

Between the first pictures and the rack's completion, I changed my mind and cut the front part lower than the rear. Here it is, painted and installed.

 |
|
| Back to top |
|
|
wez
***
Joined: 04 Jan 2010
Posts: 177
Location: Gateshead
|
| Posted: Fri Nov 08, 2013 19:21 Post subject: |
|
|
Nice work!
Keep the pics coming.
I hope it gets put to good use.

_________________
1997 Trooper 3.1TD Duty Manual - Sheddy winter runabout.
1996 LWB Trooper 3.1TD Citation - N995TTY - Sold
1995 LWB Bighorn 3.1TD Lotus - M981XVE - P/Xed in for a Sierra Cosworth
1997 LWB Trooper 3.1TD Citation - N288LAG - Gone, never forgotten |
|
| Back to top |
|
|
griffter
******
Joined: 07 Dec 2010
Posts: 955
Location: west sussex
|
| Posted: Fri Nov 08, 2013 19:29 Post subject: |
|
|
| looking good mate hope u have lots of underbody protection the sump/ trans fer box hang pretty low on the bighorns got a 93 3.1 my self also i would recommend if u can source them new hoses and new rad doubt if u want the thing boiling over whilst out and about! |
|
| Back to top |
|
|
|
|
|
You cannot post new topics in this forum
You cannot reply to topics in this forum
You cannot edit your posts in this forum
You cannot delete your posts in this forum
You cannot vote in polls in this forum
|
|


